Problema tra sistemi. Ho uno storage con TrueNAS che esporta verso un cluster due dischi iSCSI e una cartella NFS, utilizzati come datastore per le VM.
A causa di un problema con il disco di avvio dello storage ho dovuto reinstallare da zero TrueNAS, versione SCALE 23.10.0.1.
Nessun problema con la reimportazione dei volumi su TrueNAS, pochi aggiustamenti sui permessi e tutto pare tornato a posto.
I dischi iSCSI esportati verso il cluster, però, non sono visibili. Sono visibili i dispositivi fisici ma i datastore non vengono montati da nessun nodo.
In questo caso i dispositivi vengono erroneamente interpretati come snapshot. Possiamo montarli come datastore con il comando “esxcfg-volume -M xxxx“ Verifichiamo con “esxcli storage vmfs snapshot list“:
[root@alfa:~] esxcli storage vmfs snapshot list
63d4ea88-32fcf386-7e0e-yyyyyyyyyyyy
   Volume Name: iRaid
   VMFS UUID: 63d4ea88-32fcf386-7e0e-yyyyyyyyyyyy
   Can mount: true
   Reason for un-mountability:
   Can resignature: true
   Reason for non-resignaturability:
   Unresolved Extent Count: 1

63d7dc50-2758fd2c-fca2-xxxxxxxxxxxx
   Volume Name: iSSD
   VMFS UUID: 63d7dc50-2758fd2c-fca2-xxxxxxxxxxxx
   Can mount: true
   Reason for un-mountability:
   Can resignature: true
   Reason for non-resignaturability:
   Unresolved Extent Count: 1
In effetti i due dischi vengono visti come snapshot. Forziamo il mount dei datastore:
Per inoltrare il traffico TCP o UDP ricevuto dall’interfaccia esterna di un FortiGate verso un server interno dobbiamo seguire questi due passi:
Aggiungere un Virtual IP
Aggiungere una regola sul firewall
In questo esempio configuriamo l’inoltro di una porta per permettere l’accesso ad un server Windows interno con il protocollo RDP, che utilizza la porta di default 3389.
Per aggiungere un “virtual IP” che inoltra i pacchetti RDP:
1) Per FortiOS 6.0.x,6.2.x,7.0.x,7.2.x, Naviga su Policy & Objects -> Virtual IPs. 1.1) Seleziona Create New. 1.2) Aggiungi un nome per il virtual IP. 1.3) Seleziona l’interfaccia esterna. Solitamente questa è l’interfaccia che connette il Fortigate ad Internet. 1.4) Seleziona l’indirizzo ip o il range esterno. Si può utilizzare:
L’indirizzo IP pubblico dell’unità FortiGate.
Se si è connessi con un cavo o è presente una connessione DSL con ip dinamico è possibile utilizzare 0.0.0.0.
Se il provider (l’ISP) fornisce un blocco di IP che vengono ruotati all’interfaccia esterna del FortiGate, è possibile utilizzare qui uno di questi indirizzi IP. 4)Imposta il “Mapped IP Address” all’indirizzo IP interno del server Windows. 5) Seleziona Port Forwarding. 6) Imposta il protocollo su TCP. 7) Imposta l’External Service Port e Map to Port. In questo esempio il servizio RDP utilizza la porta 3389. Imposta entrambi (External service port e Map to Port) a 3389. 8) Seleziona OK.
Adesso tutto quello che rimane è definire una policy sul firewall che accetta il traffico da internet e lo inoltra al server Windows interno.
Per aggiungere una regola al firewall con un virtual IP:
1) Per FortiOS 6.0, vai su Policy & Objects -> IPv4 Policy. Per FortiOS 6.4.x,7.0.x,7.2.x, vai su Policy & Objects -> Firewall Policy. 2) Seleziona Create New. 3) Imposta Source Interface all’interfaccia WAN/Internet. 4) Imposta Source Addresses a all. 5) Imposta Destination Interface a internal. 6) Imposta Destination Address al nome del virtual IP. 7) Solitamente non è necessario modificare l’inoltro in questa policy. In questo esempio il Service può rimanere ANY, dato che il virtual IP inoltra solamente i pacchetti che utilizzano la porta 3389. 8) Seleziona OK.
Test di inoltro di un servizio, hands-on 🙂
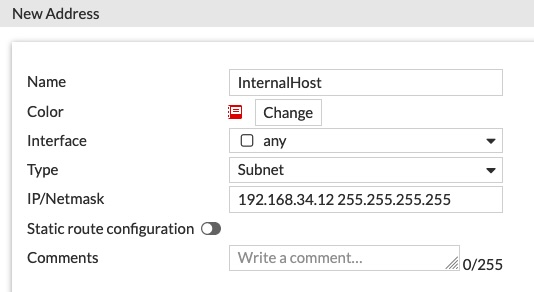
In questo esempio la rete interna è la 192.168.34.0/24, il gateway di sistema impostato sulla SD-Wan. Mettiamo su un IP interno – 192.168.34.12 – un servizio (in questo caso un server web con nginx) che ascolta sulla porta 34567 (una porta molto a caso)
Per prima cosa creiamo gli oggetti come riferimento.
Creiamo l’host: Policy & Objects -> Addresses -> Create new
Poi creiamo il riferimento per il servizio: Policy & Objects -> Services -> Create New
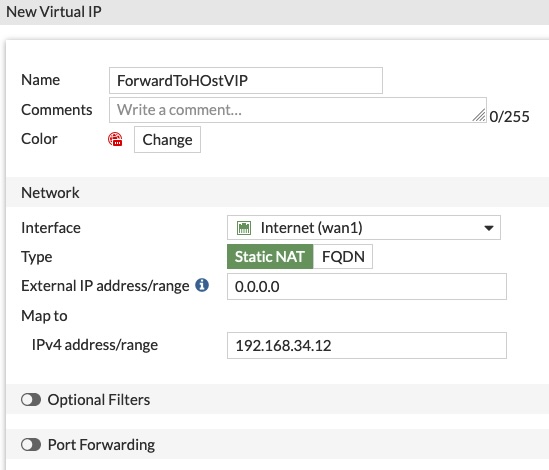
Quindi il Virtual IP: Policy & Objects -> Virtual IP -> Create New Diamo un nome all’oggetto, selezioniamo l’interfaccia sorgente (WAN1) e l’ip interno su cui mappare il servizio
Attenzione: possiamo impostare l’interfaccia fisica (WAN1) e lasciare l’ip come 0.0.0.0 oppure lasciare l’interfaccia su ANY e scegliere gli ip (ip singolo o range) su cui agire.
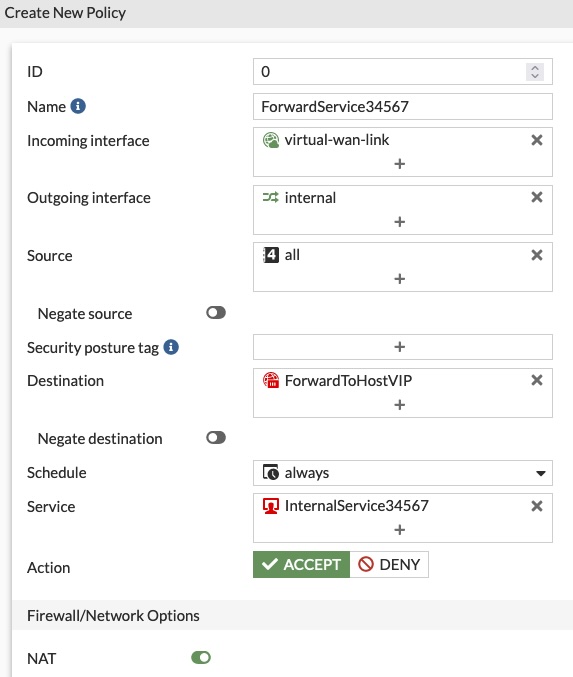
A questo punto creiamo la regola nella sezione Firewall: Policy & Objects -> Firewall Policy
Diamo un nome alla regola, poi scegliamo la “Incoming Interface“, che sarà l’interfaccia che connette il dispositivo a internet (solitamente la WAN1 oppure, come qui, la virtual-wan-link) Selezioniamo come “Outgoing Interface” la rete di destinazione (la rete interna), il “Source” che in questo caso può essere “all” e la “Destination“, scegliendo il Virtual IP dagli oggetti (attenzione a scegliere il Virtual IP e non l’host); come servizio scegliamo, appunto, il servizio creato poco sopra. NAT è abilitato di default.